Photography Tips | How To Photograph The Stars
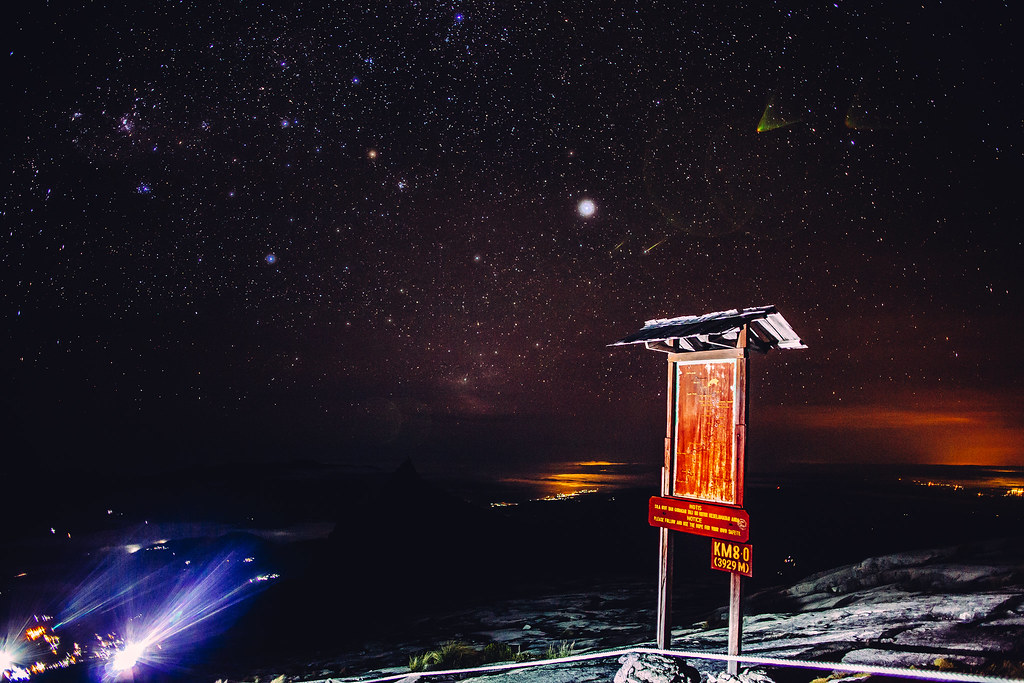
© 2013 Wazari Wazir | The Stars at Mount Kinabalu | Photograph Taken at KM8.0
I’m not really into astrophotography but I would like to share with you on how I got this shot. The photograph above were taken at Mount Kinabalu in Sabah during my fourth climb. Since this is my fourth climb, I don’t really in a hurry to get to the Low’s Peak, the summit of Mount Kinabalu at an altitude of 4095.2 meters above sea level.
I think I better find something else, something that I’ve never photograph before at Mount Kinabalu. So I decided to photograph the stars that can be seen from the top of Mount Kinabalu.
First of all, you really need to find a dark place where you can see the stars clearly. You will never get a good stars photography if you choose to photograph it from a big city centre, you really need to get out of town, where there is less or no light pollution’s and you can see the stars clearly on a clear night sky.
I’ve always wanted to photograph stars from Mount Kinabalu because as far as I can remember, I did not see so many stars anywhere else here in Malaysia other than at Mont Kinabalu. Maybe because of its height, far away from city centre makes it a perfect place.
Anyway, just to answer your curiosity, the light that you saw on the left corner of this picture comes from the headlight of the climbers. Most climbers start climbing Mount Kinabalu from Laban Rata as early as 2:00 AM, so it was dark, the reason for the early climb is because most climbers wanted to be at the summit before the sunrise which is around 5:30 AM.
I did not use flash to light the signpost but it was lit by the headlight of the climbers. Just to let you know also, this area is a favourite place for climbers to get their photograph taken.
Anyway back to the stars photography, I did use a tripod for this shot, yes you need a sturdy tripod. And it can be very challenging to use a tripod here, it was cold to the bone and things got worse when I need to take off my gloves to set up the tripod and to adjust my camera settings. It was very difficult to adjust your camera wearing a thick gloves.
The first thing is to find the right location, then set up the tripod. After that I need to use long exposure since it was very dark. I use 20 second shutter speed, open the aperture at f/2.8 and put the ISO at ISO6400. THe lens that I’m using for the photograph is 24 mm.
At first I use 30 second of exposure but I found out it was too bright, so I adjust back the exposure and 20 second gives me the best result. About the focusing, yes it can very hard to focus in the dark, so I put my camera on manual focusing mode and set it to the infinity.
When photographing something tricky like this, you really need to do some kind of an experiment, use this setting as a guidelines, or as a starting point. Then adjust back the setting accordingly. You can either adjust the shutter speed or the ISO but very rarely you need to adjust the aperture.
If you asked me, why I don’t use smaller aperture and lower ISO like ISO 100? Well, If I use lower ISO and smaller aperture, I need much longer exposure than 20 or 30 seconds, I might need one minute, thirty minute or even an hour of exposure and then I will get a star trails, I don’t want a star trails, I just wanted the stars.
To summarise it; Use large Aperture, the largest Aperture that your camera have, I use f/2.8. Use Hight ISO 5000/6400 (Please Experiment), Use longer shutter speed (20-30 Seconds) and of course you need to use a sturdy tripod and most importantly you need to find the right location, where you can see million or billion of stars on the night sky, you need to find a place that is very far from the city centre.
If you ever get bored at your normal day to day subjects of photographs, maybe you need to look up for the stars.
“Don’t Lose Hope. When the Sun Goes Down, The Stars Come Out”
– Ethel –


