Photoshop Tips and Tricks | How To Get Retro Color Effects
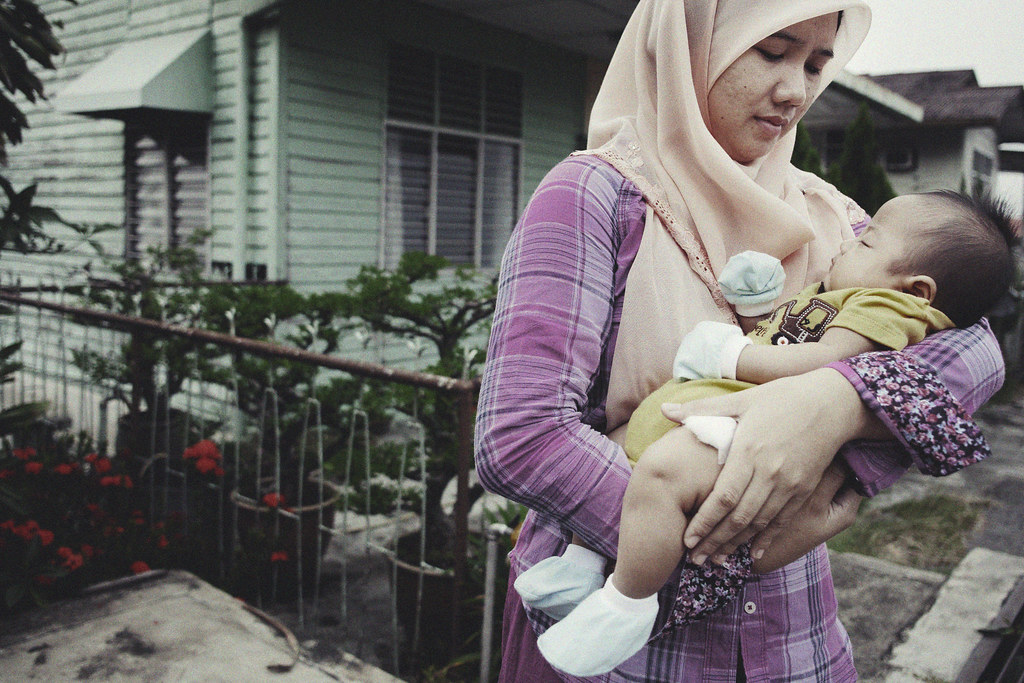
© 2011 Wazari Wazir | My Wife and My Son Raphael Back From The Clinic | Retro Color Effect
There are many ways to get this effects, retro effect or old school kind of effect where we try to mimics the look of early 60s or 70s photograph where they lack contrast, a bit fade and lot’s of grain. The easiest way is off course to use a camera film, use High ISO Film like ISO 400 to 1600 and if you use expired roll of film, maybe you will get a better result, “better” here I mean not beautiful but better in term of mimicking the look of old school.
For this photograph, I didn’t use film but taken with a digital camera with 24mm lens. If you look back at the photographs in the 60s or 70s, they rarely shot with long lens and hardly have any “Bokeh” most of the camera at that time were equipped with either standard 50mm lens or wide angle lens, like 24mm or the most popular one which is 35mm lens. Yes this photograph look like it was taken with a compact camera because of the focal length that I use which is 24mm and normally most compact camera were fixed with wide angle lens. So that is one of the aspect that needs to be taken if you want to have the look of old school.
The other thing is that, take a look at the environment of this photograph, the old wooden house behind my wife is so 60s or 70s, it is not modern but really old house maybe it was there since early 60s, I like that look and I would like to mention here, this is not a pre planning shot, my wife just get back from the clinic nearby to get a jabs for my three month old son Raphael. I was always wanted to take a photograph here because I like this environment.
Enough about the story, lets talk about the post processing, basically what I do is I edit it just like normal processing in Photoshop. After normal editing, I just lower the contrast of the picture, reduce the saturation of the picture. Then I duplicate the photograph, now I have two layers of the same picture. For the top layer, I convert it onto black and white, you can use any method that you are comfortable with to get your photograph into monochrome mode, either desaturate or just turn it into black and white.
Then what do we do with the black and white image. I go to FILTER Menu and then look for TEXTURE and select GRAIN, for the Grain type, I select “Enlarged”. Basically the intensity is Higher than the contrast, for this picture my “Intensity” is 50 and my “Contrast” is 26. You don’t have to follow this figure as it is because different camera File or different Megapixels needs different Intensity and Contrast, actually you can see the result in real time, so need not to worry.
After that I just lower the Opacity of the black and white image to my liking, I mean, until I satisfy with the result, this is pure experimentation actually, hopefully you get the idea, like I said before, there are many ways to get this effect and some picture will work with this effect while others might not work well. So it is good to know many ways of doing things so that you can use it for different pictures.
Have fun editing…


2 Comments
Nia Ridzwan
Salam alaik Bro.
Ni ada gambar-gambar yang saya edit setelah ikut tutorial Bro.
http://niaridzwan.blogspot.com/2011/10/nat-rabu.html
Terima kasih untuk tutorial. Mudah dan praktikal. Tegurlah mana-mana silap saya punya editing, baru nak menapak 🙂
Regards,
Ur silent reader 🙂
Gambar-gambar Bro Wazari tak pernah mengecewakan saya.
Wazari Wazir
@Nia Ridzwan, saya dah singgah blog you, memang nampak menarik, macam gambar guna filem awal 70an dulu, gambar warna pun ok, gambar BW pun ok, it’s great to know how to play around with the photographs… 🙂