Basic Digital Photography Tips | How To Choose The Right ISO For Your Digital Photography
© 2011 Wazari Wazir | Joy of Reading | ISO 1000 | 1/60 | f/5.6 | 10-20mm UWA Lens
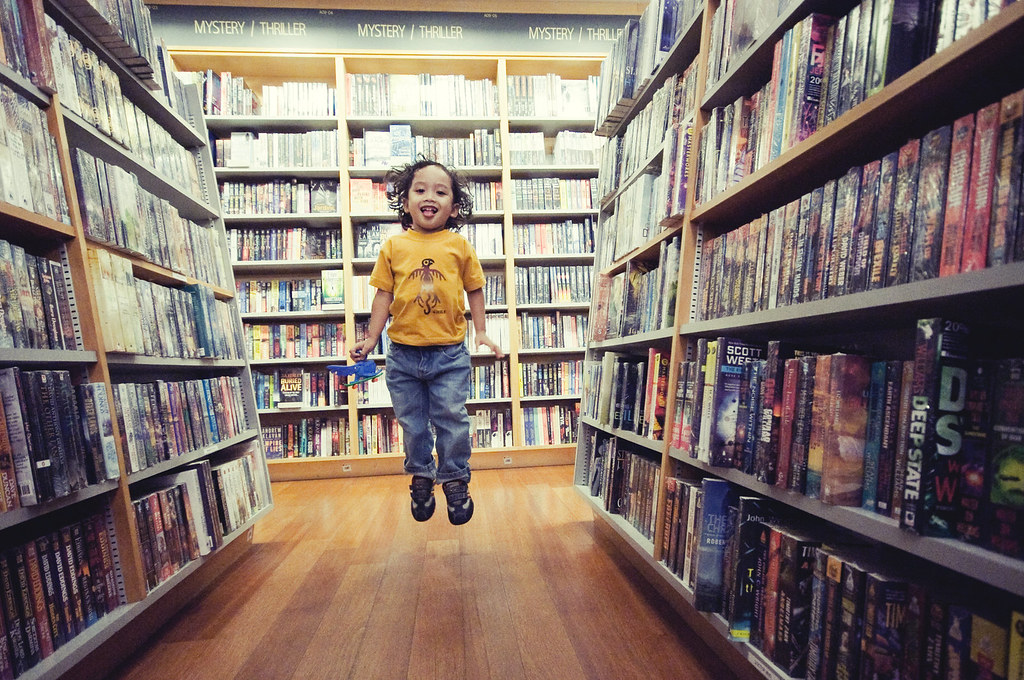
© 2011 Wazari Wazir | Jumping With Joy | ISO 5000 | 1/125 | f/4.8 | 10-20mm UWA Lens
Before I go further I would like to let you know what is ISO stand for. ISO is International Standard Organization or The International Organization for Standardization. In plain English it is an international standard-setting body composed of representatives from various national standards organizations.
Enough about that, I don’t want to go deeper about that organization, all I wanted to share with you here is the relation of ISO with photography, photographers often talk about ISO, High ISO, Low ISO, the pros and cons of using certain ISO setting.
During film photography ISO or (ASA) refer to the sensitivity of the film to the light. It was measured in numbers, usually you can see the number printed on the film box or cartridge, you can see 100,200, 300 or even 1600 on the film cartridge, the higher the number, the sensitive the film to the light and the lower the number, the lower the sensitivity of the film towards the light.
Same goes on with Digital Camera, but the difference is that the ISO indicate the sensitivity of the sensor towards the light and the greatest difference between the Film ISO and Digital Camera Sensor is that, you can change the ISO in your digital camera frame by frame, meaning that you can shoot one frame with ISO 100 and then you can change the ISO to 1000 for the next frame, you can’t do that with film camera, if you have film ISO 100 inside your camera, you are stuck with that ISO for the entire roll, for the entire 36 frames if you use 36 frames roll of film.
Did I get your attention here, hopefully you are not confused. To get things straight, the higher the ISO number, whether you use film or digital camera, the more sensitive the film or the sensor and the lower the ISO number, the lower the sensitivity of the film or the sensor towards the light.
Once you understand the relation between the ISO and the sensitivity of digital camera sensor or film, you need to know why you need to use one over the other, why you need to use Higher ISO and why you need to use Lower ISO. One thing that I should let you know, the higher the ISO, the less smooth the picture will be, for an example if you shoot a portrait with ISO 1000, you will see noise or grain when you look at it closely at your computer screen and on the other hand if you use Lower ISO like ISO 100 to shoot a portrait, you will see less noise or grain, your portrait shot will look smooth as silk, no grain effect.
One thing that you should keep in mind is that, the best ISO is always the Lowest ISO, not the highest, meaning that if your camera allowed you to use ISO 50, that’s the best ISO but most of digital camera nowadays have its lowest ISO somewhere around ISO 100 and 200. Just because your camera allowed you to use ISO 104,000 doesn’t mean that it is the greatest ISO of all, yes it is among the most sensitive to the light but you need a very solid reason why you need to use that High ISO. Basically using Higher ISO is the last option when Lower ISO can’t give you the right combination between, Shutter Speed and Aperture to get the result or the right exposure.
So whenever you go out shooting always set the ISO to its lowest setting (ISO 100 or 200) and gradually increase it if the ISO sensitivity is not practical for certain type of environment or situation. If you look at my son picture above where he sit alone reading the book, I’ve to use ISO 1000 to get properly exposed image. Why I don’t use ISO 100? The reason is that the light inside the Kinokuniya Bookstore is not bright enough and if I were to use ISO 100 for that shot, I’ve to use maybe few seconds of exposure to get it properly exposed.
If I use one or two second of exposure inside the bookstore, I will get few peoples in the frame as well because this place is quite busy with people during the weekend, so I need to increased the ISO so that I can use faster shutter speed. Just be remember, High ISO is more sensitive towards light, so that you can use faster shutter speed to get it properly exposed.
On the next photograph where my son is jumping, I have to increase the ISO to 5000, the reason is that if I use the same setting like the first picture where I shoot with ISO 1000 with shutter speed 1/60, I will get a blurry picture. I can use the setting for the first picture because my son is just sitting there reading a book but if I use the same setting for the picture of my son jumping, I will get a blurry picture, why? Because the shutter speed of 1/60 is not fast enough to freeze the action.
In order for me to get the right exposure and in order for me to be able to use faster shutter speeds to freeze my son action, I need to increase the ISO, only by increasing the ISO I can use faster shutter speed, which in this case 1/125, good enough to freeze him airborne, but the consequence is, I get a grainy or “noise” picture, you can see that the quality of the first photograph is a lot more better then the one where my son is jumping.
Like I said previously the higher the ISO, the more noise or grain that you will get. The photograph is not smooth, grainy but most importantly I get the picture, and visually you get the story even though the picture is not as smooth as silk. Why don’t I use flash here then, you may ask? I will get kick out of the bookstore if I use flash here before I can get the chance for the next shot.
By now hopefully you get the idea when and why you need to use Higher or Lower ISO. Sometimes the right ISO will get you the shot but not necessarily give you the best optimum quality in term of digital image quality but sometimes it is better to get a grainy shot that tells a story than to get super clean digital file with nothing to tell.
Most of the times photographers will use Higher ISO when dealing with moving subjects in the environment where the lighting is not so bright , where the lighting is not strong enough for the photographers to use lower ISO taking picture handheld without tripod. Know the ISO sensitivity and its usability and you must also know why you need to use higher or lower ISO depending on the lighting condition and subject matters.


2 Comments
SisHoney
– hari tu kena marah sbb shoot dlm border 🙁
– sll guna ISO paling maksimun 🙁
anai
sharing ilmu yang menarik..terima kasih.