Photoshop Tips | Selective Editing | Dodging and Burning
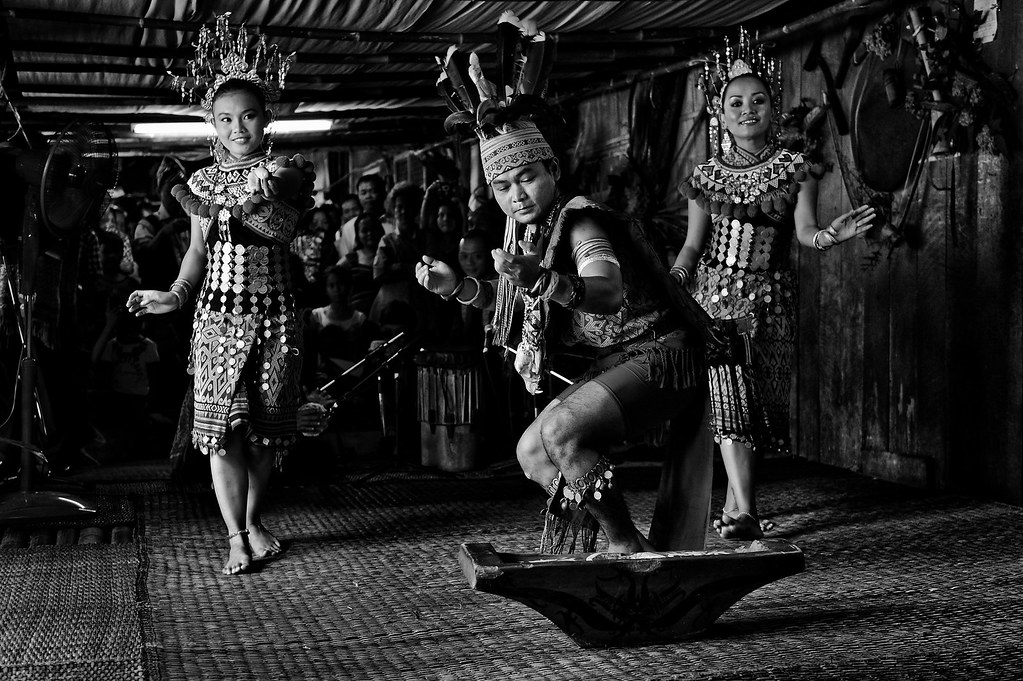
© 2012 Wazari Wazir | Traditional Sarawak Cultural Show | Annah Rais Longhouse | Sarawak
In traditional photography during film days, dodging and burning were done inside the lightroom under the enlarger, where we burn certain part of the area to make it darker and dodge certain part of the area to make it lighter. Under the enlarger, if we put more exposure “burn” certain part of the area which falls on the paper under the enlarger, that part will be darker and if we put less exposure “dodging”, that particular area will be lighter, yes it is reverse result if we printing from a negative film.
The reason why we did that is because for most of the times we are shooting under not very good lighting condition, for example the photograph of the cultural show above, actually there are a lot of area in the picture above that are too bright and tend to be a distraction for the viewers which in the end take away the focus from the performers. In order to get back the attention of the viewers towards the performance, I need to darien certain part of the photograph and bring back or draw back the viewers attention towards the performers because they are the main subjects in this particular photograph.
Normally our eyes are drawn towards anything that is brighter in the photograph and the least brighter part of the area will be less likely to be the main focus of our eyes. So dodging and burning help me to solve this problem, actually there are other ways to get this similar output like using “masking” in Photoshop but whatever methods that we choose, the main purpose is to draw the eyes towards the main subject, same like using large aperture on our lens to take a portrait shot of someone, the large aperture will throw away the background out of focus and making the subject stand out and be the main focus to our eyes, same like what dodging and burning do to our photograph, which is to draw the eyes towards the main subject.
For this particular photograph, I burn “darken” the lower area on the left side of the photograph, making the lighting on the woven mat less brighter and to make it more or less the same as the light that falls on the lower right of the picture, and as a result those three cultural performance stand out from the rest of the elements. When taking picture of a landscape, you can easily correct or balance the exposure between the brighter area of the sky and the less brighter area on the foreground using Neutral Density or Graduated Filter, but for tricky lighting conditions like this one, those filters can’t solve the problem, hence dodging and burning is among the things that we can do to make it better.
* To learn more about Dodging and Burning, you might wanted to check this : Dodge and Burn eBook
* You might wanted to check this one also, about how colours affect visual weight and influence attention from Captivating Colors eBook


One Comment
Jeffrey K. Edwards
Waz – I love the insights you share on your postprocessing work! One of the things that sometimes frustrates me is that some photographers aren’t willing to share their knowledge or insights regarding their craft. You are a standout among the multitudes of working pros.
I agree that the art of “dodging & burning” is a must for any serious photographer. The ability to draw the eye on a focal point using these techniques is critical. And now it has never been easier using Lightroom 4 and the adjustment brush.
I have read the new ebook on Dodging and Burning and for those who are new to this type of postprocessing – I would highly recommend it. It’s a no brainer for the price and will improve your images forever.
Thanks for sharing your work, the above image is just spectacular – w/o the postprocessing work, the visitors in the background would over shadow the performers – well done!